* 목차
- Intro
- Example
- Extension 1. useState vs useReducer
- 마치며
* React Hook useState를 알고있다는 전제 하에 글이 진행됩니다. useState 개념이 잡혀있지 않으신 분들은 이 글을 먼저 읽어주세요
React Hook - useState
* 목차 - Intro - Example - Extension 1. functional update - Extension 2. object update - Extension 3. create initial state by function - Extension 4. Resetting state with a key - 마치며 * 혹시 React Hook 자체가 개념이 잡혀있지 않으신
tyoon9781.tistory.com
Intro
이번 시간에는 React Hook 중에서 reducer를 Component에 추가하는 React Hook인 useReducer를 알아보도록 하겠습니다.
const [state, dispatch] = useReducer(reducer, initialArg, init?)
useReducer는 useState와 비슷한 Hook이지만 더 복잡한 상태관리를 필요로 할 때 사용하는 Hook입니다. 보통 3단계로 작성하게 됩니다.
- function reducer(state, action){switch(action.type)...} 형식으로 reducer를 작성
- const [state, dispatch] = useReducer(reducer, (initialArg))를 작성하여 reducer와 연결된 state와 dispatch를 선언
- <button onClick={() => dispatch({type: "TYPE"})}>ACTION</button>으로 component에 dispatch와 type을 작성
먼저 간단한 useReducer 예제부터 시작하겠습니다.
Example
먼저 component의 reducer 동작부터 정의합니다.
const INCREMENT = "increment"; // count => count + 1
const DECREMENT = "decrement"; // count => count - 1
그리고 reducer를 작성합니다.
const reducer = (state, action) => {
  // action : {type, payload}
  switch (action.type) {
    case INCREMENT:
      return { ...state, count: state.count + 1 };
    case DECREMENT:
      return { ...state, count: state.count - 1 };
    default:
      return state;
  }
};
그리고 component를 작성합니다.
export default function UserReducerComponent() {
  const initialState = { count: 0 };
  const [state, dispatch] = useReducer(reducer, initialState);

  return (
    <div>
      <p>Count : {state.count}</p>
      <button onClick={() => dispatch({ type: INCREMENT })}>Increment</button>
      <button onClick={() => dispatch({ type: DECREMENT })}>Decrement</button>
    </div>
  );
}
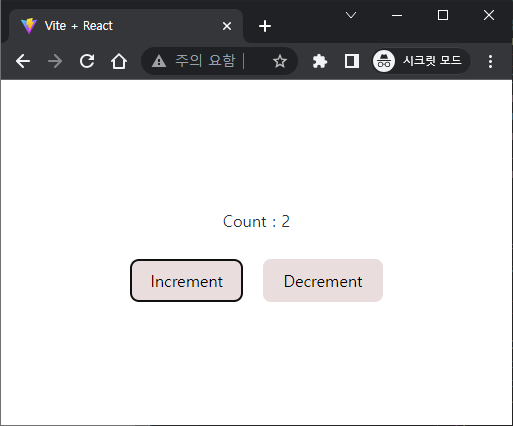
그러면 다음과 같은 결과를 확인할 수 있습니다.

이렇게 까지만 작성하면 사실상 Count를 useState로 다루는 것과 다를 바가 없습니다. 어떤 점이 useState와 useReducer가 다른 점일까요?
Extension 1. useState vs useReducer
원래 설명할 때는 예제를 간단하게 만드는 편인데 간단하게 만들면 useState와 useReducer의 기능이 구분가지 않습니다. 그래서 이번 예제는 좀 어렵더라도 작성하려 합니다.
* useReducer
import { useReducer, useState } from "react";

const todoReducer = (state, action) => {
  switch (action.type) {
    case "ADD_TODO":
      return [...state, action.payload];
    case "DELETE_TODO":
      return state.filter((_, index) => index !== action.payload);
    default:
      return state;
  }
};

function TodoApp() {
  const [todos, dispatch] = useReducer(todoReducer, []);
  const [newTodo, setNewTodo] = useState("");

  const handleInputChange = (event) => {
    setNewTodo(event.target.value);
  };

  const handleAddTodo = () => {
    dispatch({ type: "ADD_TODO", payload: newTodo });
    setNewTodo("");
  };

  const handleDeleteTodo = (index) => {
    dispatch({ type: "DELETE_TODO", payload: index });
  };

  return (
    <div>
      <input type="text" value={newTodo} onChange={handleInputChange} />
      <button onClick={handleAddTodo}>Add Todo</button>
      <ul>
        {todos.map((todo, index) => (
          <li key={index}>
            {todo}{" "}
            <button onClick={() => handleDeleteTodo(index)}>Delete</button>
          </li>
        ))}
      </ul>
    </div>
  );
}

export default TodoApp;
* useState
import { useState } from "react";

function TodoApp() {
  const [todos, setTodos] = useState([]);
  const [newTodo, setNewTodo] = useState("");

  const handleInputChange = (event) => {
    setNewTodo(event.target.value);
  };

  const handleAddTodo = () => {
    setTodos([...todos, newTodo]);
    setNewTodo("");
  };

  const handleDeleteTodo = (index) => {
    const newTodos = todos.filter((_, i) => i !== index);
    setTodos(newTodos);
  };

  return (
    <div>
      <input type="text" value={newTodo} onChange={handleInputChange} />
      <button onClick={handleAddTodo}>Add Todo</button>
      <ul>
        {todos.map((todo, index) => (
          <li key={index}>
            {todo}{" "}
            <button onClick={() => handleDeleteTodo(index)}>Delete</button>
          </li>
        ))}
      </ul>
    </div>
  );
}

export default TodoApp;
이 두 코드는 사실상 같은 기능을 하고 있습니다. 하지만 벌써 useState와 useReducer의 확장성이 눈에 차이난다는 것을 알 수 있습니다.
사실상 useReducer는 복잡한 상태관리, 더 나아가 component끼리의 상태를 주고 받아야 할 때, 전역적인 상태관리(+useContext와 함께)를 해야 할 때 필요합니다.
마치며...
이번에는 좀 글이 짧다고 느끼시나요? 하지만 useReducer는 진짜로 특별한 기능이 있는 것이 아니라 useState보다 좀 더 복잡한 형태의 상태관리를 위한 Hook일 뿐입니다. 그리고 특히 logic을 분리하는데 특화되어 있습니다. 그렇기 때문에 useReducer는 useContext, useEffect, useCalback등 다양한 상태 업데이트에 대해서 처리하는데 유용하게 사용할 수 있습니다. 다음 시간에는 useContext, useEffect에 대해서 먼저 알아보는 시간을 가져보도록 하겠습니다. 감사합니다.
'React > Basic' 카테고리의 다른 글
| Redux로 React의 Props drilling 해결하기 (0) | 2023.09.20 |
|---|---|
| React Hook - useEffect (0) | 2023.08.02 |
| React Hook - useState (0) | 2023.07.23 |
| React Hook 알아보기 (0) | 2023.07.23 |
| Material UI - Tutorial (0) | 2023.07.09 |


