
* 목차
- Intro
- Nginx 설치
- Nginx 실행
- Nginx 구조 살펴보기
- Nginx로 나만의 Service 적용하기
Intro
이번 글은 Nginx tutorial입니다. Nginx의 간단한 설정방법과 나만의 service를 만들어 보도록 합시다.
* 환경은 EC2의 ubuntu에서 진행했습니다.
AWS - EC2 초 간단 생성 + vscode 원격연결 (2023년 version)
독립된 서버가 급히 필요한데 주변에 아무것도 없다면? Linux OS가 필요한 상황인데 집에 Windows만 있는 상황이라면? Docker를 windows 환경에서 또 새로 구축하긴 귀찮죠... 그럴 때는 EC2를 사용해 봅시
tyoon9781.tistory.com
Nginx 설치
sudo apt update
sudo apt install nginx
Nginx 실행
nginx 설치만으로도 service가 start 됩니다. 별 문제가 없다면 http://{server_ip}에 접근해 봅시다. 바로 Nginx Welcome page를 확인할 수 있습니다.

만약에 nginx가 켜져있지 않다면 다음과 같이 실행해볼 수 있습니다.
sudo service nginx start
Nginx 구조 살펴보기
1. 설정 위치
nginx에 대한 설정은 /etc/nginx에 있습니다.

2. nginx service 설정
위에 nginx 설정들에 보시면 sites-available, sites-enabled가 있습니다.
- sites-available은 동작 가능한 service 문서들을 작성, 저장하는 곳입니다.
- sites-enabled는 실제로 nginx가 service할 것 들입니다.
- 보통은 available에 service config 내용을 작성 후 enabled에 심볼릭 링크를 겁니다.

위에서 확인했던 Nginx Welcome page는 /etc/nginx/sites-enabled에 있던 default link가 실행된 것입니다. 그리고 그 default link는 /etc/nginx/sites-available/default를 원본으로 하여 연결되어 있는 형태입니다. 내용을 확인해 보겠습니다.
server {
    # IPv4에 대한 listen
    listen 80 default_server;
    # IPv6에 대한 listen
    listen [::]:80 default_server;

    # root directory에 대한 경로
    root /var/www/html;

    # serving할 file명. 기본값은 index.html
    index index.html index.htm index.nginx-debian.html;

    # 여기에서 구입한 도메인을 입력할 수 있다.
    server_name _;

    # url mapping.
    # try_files구문을 통해 먼저 $uri를 찾아보고 그다음 $uri/, 그 다음은 404 error를 띄운다.
    location / {
        try_files $uri $uri/ =404;
    }
}
nginx 설정을 처음 보시는 분들은 어려워 하실 수 있습니다. 하지만 위 내용은 사실 html file 하나를 serving 하기 위한 기본 설정일 뿐입니다. 천천히 읽어보시면 쉽게 이해가 되실 겁니다.
다 읽어보셨으면 이 default service는 root directory를 /var/www/html/로 하여 index를 serving하겠다고 합니다. 실제로 /var/www/html에 해당하는 index file이 있는지 확인해 볼까요? 확인해 본 결과 index로 언급한 파일 목록 중 일치하는 항목인 index.nginx-debian.html이 있는 것을 확인해 볼 수 있었습니다.

아래는 index.nginx-debian.html 문서입니다. 처음에 봤던 그 nginx welcome page의 html 문서 입니다.
<!DOCTYPE html>
<html>
<head>
<title>Welcome to nginx!</title>
<style>
    body {
        width: 35em;
        margin: 0 auto;
        font-family: Tahoma, Verdana, Arial, sans-serif;
    }
</style>
</head>
<body>
<h1>Welcome to nginx!</h1>
<p>If you see this page, the nginx web server is successfully installed and
working. Further configuration is required.</p>

<p>For online documentation and support please refer to
<a href="http://nginx.org/">nginx.org</a>.<br/>
Commercial support is available at
<a href="http://nginx.com/">nginx.com</a>.</p>

<p><em>Thank you for using nginx.</em></p>
</body>
</html>
3. nginx.conf
sites-enabled가 service의 configuration을 작성하는 영역이었다면 nginx.conf는 nginx의 설정 그 자체를 다루게 됩니다.
기본 설정값을 확인해 보겠습니다. 설명은 주석을 참고해 주세요
## 모든 값은 default 설정입니다.

# user 설정. 권한을 root로 두지 않도록 합시다.
user www-data;

# nginx가 사용할 core를 할당.
worker_processes auto;

# pid 정보.
pid /run/nginx.pid;

# 추가 설정할 config 파일 경로.
include /etc/nginx/modules-enabled/*.conf;

# nginx의 비동기 이벤트 처리 옵션
events {
	# 최대 접속자수
	worker_connections 768;
}

# http 접속 설정. 비활성화 된 옵션은 제거했습니다.
http {
	# Basic Settings
	sendfile on;
	tcp_nopush on;
	types_hash_max_size 2048;

	include /etc/nginx/mime.types;
	default_type application/octet-stream;

	# SSL Settings
	ssl_protocols TLSv1 TLSv1.1 TLSv1.2 TLSv1.3; # Dropping SSLv3, ref: POODLE
	ssl_prefer_server_ciphers on;

	# Logging Settings
	access_log /var/log/nginx/access.log;
	error_log /var/log/nginx/error.log;

	# Gzip Settings
	gzip on;

	# Virtual Host Configs
	# 여기에서 sites-enabled에 있는 service를 실행하도록 설정되어 있다.
	include /etc/nginx/conf.d/*.conf;
	include /etc/nginx/sites-enabled/*;
}
여기까지 따라오셨다면 이제 Nginx가 어떻게 file을 serving 하는지 아셨을 겁니다. 이제는 본인만의 service를 적용해 볼 차례입니다.
Nginx에 나만의 서비스를 적용하기
이번에는 자신만의 html을 만들어서 nginx로 serving 해 봅시다. 저는 hello world를 보여주는 page를 service 하겠습니다.
<h1>hello world</h1>
이 내용을 ~/nginx_practice/index.html 파일에 작성합니다.
cd ~
mkdir nginx_practice
cd nginx_practice
echo "<h1>hello world</h1>" >> index.html
default service는 새로운 service와 port 충돌과 같은 문제를 일으킬 수 있으니 삭제합니다. default service 내용은 sites-available에 있으니 다시 되살리고 싶다면 symbolic link를 걸면 다시 service 할 수 있습니다.
cd /etc/nginx/sites-enabled
sudo rm -rf default
제가 service 할 service명은 myservice입니다. myservice라는 파일을 sites-avaible에 만들어 주도록 합시다.
cd /etc/nginx/sites-available
touch myservice
그리고 myservice에 server 설정 내용을 적습니다. ~/nginx_practice/index.html 파일을 serving 할 수 있도록 root path를 잘 작성하도록 합시다. port 설정이나 기타 설정은 본인에 맞게 작성하셔도 됩니다.
server {
	listen 80 default_server;
	root /home/ubuntu/nginx_practice;

	server_name _;

	location / {
		try_files $uri $uri/ =404;
	}
}
sites-available에 myservice 작성이 끝났으면 sites-enabled에 절대경로로 심볼릭링크를 겁니다.
sudo ln -s /etc/nginx/sites-available/myservice /etc/nginx/sites-enabled/myservice
nginx가 myservice를 실행할 수 있도록 파일 mode를 변경합니다.
sudo chmod 755 myservice
nginx가 /home/ubuntu/nginx_practice 경로를 사용할 수 있도록 nginx의 user를 ubuntu, 혹은 본인의 user명에 맞게 변경해 줍니다. nginx.conf의 맨 위에 user설정이 있는데 이 부분을 변경하면 적용됩니다.
# user www-data;
user ubuntu;
준비가 끝났습니다. nginx를 재 실행해 봅시다.
sudo service nginx restart
그리고 browser에 http://{server_ip}로 접속해 봅시다.
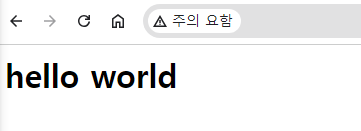
위와 같은 화면이 떴다면 Nginx로 본인의 Service를 제대로 실행하게 된 것입니다. 축하합니다.
* reference
https://ubuntu.com/tutorials/install-and-configure-nginx
Install and configure Nginx | Ubuntu
Ubuntu is an open source software operating system that runs from the desktop, to the cloud, to all your internet connected things.
ubuntu.com
'Backend > Basic' 카테고리의 다른 글
| [git push 문제] remote: Support for password authentication was removed on August 13, 2021. (0) | 2024.02.13 |
|---|
