
Event Handling
Event란 무엇일까요? 다양한 뜻이 있지만, 보통은 사건 발생을 의미하며, 게임에서는 사용자의 입력을 의미하기도 합니다. 이런 Event 처리를 Event Handling이라 합니다. pygame에서는 어떤 식으로 event handling을 할지 살펴봅시다.
    def _event(self):
        for event in pg.event.get():
            if event.type == pg.QUIT:   ## Window 상단 X버튼
                self._running = False
이전에 봤던 함수죠? pg.QUIT가 없으면 종료조차 못하는 pygame을 확인했던 그 함수입니다. 이 pg.event.get()을 통해, 움직이는 물체를 만들어 보겠습니다.
움직이는 물체를 만들기 위해선 다음과 같은 동작이 필요합니다.
- 키보드 입력 인식
- 키보드의 입력값을 파악하여 물체 위치를 변경
키보드의 입력값을 받는 것처럼 보이는 pygame.event.get()이 어떤 함수인지 살펴보았습니다.

eventlist는 검색해도 정확한 정보를 찾기 어려웠습니다. vscode에서 get 함수가 어떻게 작성되었는지를 확인해볼까요?

즉, list에 담겨진 event들을 얘기하는 것이었습니다. 그렇다면 event는 어떻게 관리될까요? pygame.event를 확인해 봅시다.

확인해 보니 pygame에서 event는 quene 형태로 관리된다고 합니다. 하지만 여기서 실질적으로 어떻게 또 다른 정보를 찾기 어렵습니다. keyboard의 값을 pygame.event.get()은 어떻게 처리를 하는 것일까요? 공식문서에서 keyboard로 검색해 보았습니다.
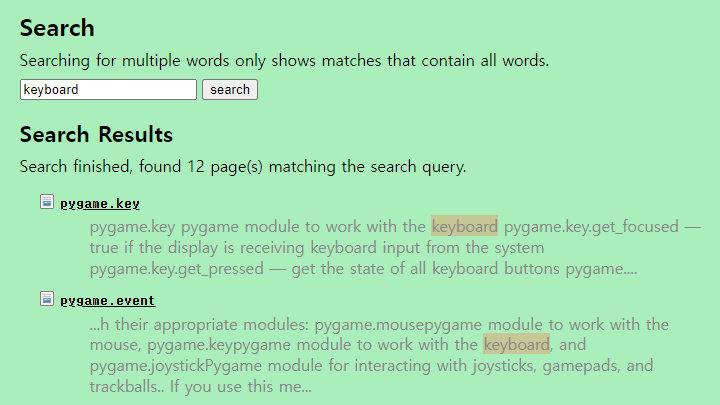
pygame.key에 대한 설명이 있습니다. 설명을 들어가 봅시다.

pygame.event는 키보드를 누르는 pygame.KEYDOWN과 키보드를 떼는 동작인 pygame.KEYUP에 대해서 받아들인다고 합니다. 그리고 이 event는 key값을 가지고 있다고 합니다. key값이 화살표인 것만 찾으면 될 것 같습니다.

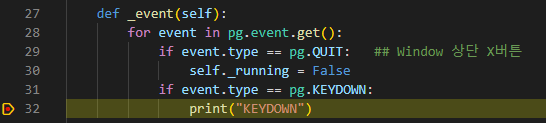
방향키의 key값을 찾았습니다. 이제 coding을 해봅시다. 먼저 pg.KEYDOWN을 test 합니다.
Keyboard 입력을 Test
    def _event(self):
        for event in pg.event.get():
            if event.type == pg.QUIT:   ## Window 상단 X버튼
                self._running = False
            if event.type == pg.KEYDOWN:
                print("KEYDOWN")
pygame 2.2.0 (SDL 2.0.22, Python 3.11.1)
Hello from the pygame community. https://www.pygame.org/contribute.html
KEYDOWN
KEYDOWN
KEYDOWN
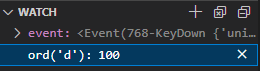
키보드를 3번 눌렀더니 print가 제대로 동작합니다. 이제는 저 구문을 debugging 하여, event에 어떤 속성이 들어가 있는지 확인해 보도록 하겠습니다.

event안에는 key값과 mod, scancode, type, unicode 등이 있습니다. 제가 'd' key를 누른 순간이 잡힌 듯합니다. key 값은 unicode로 관리된다 했으며, 실제로 ord('d')를 해보면 100이 출력되는 것을 확인할 수 있습니다.
이제는 key값을 등록하여 제대로 동작하는지 확인해 보겠습니다.
    def _event(self):
        for event in pg.event.get():
            if event.type == pg.QUIT:   ## Window 상단 X버튼
                self._running = False
            elif event.type == pg.KEYDOWN:
                if event.key == pg.K_UP:
                    print("key up")
                elif event.key == pg.K_DOWN:
                    print("key down")
                elif event.key == pg.K_RIGHT:
                    print("key right")
                elif event.key == pg.K_LEFT:
                    print("key left")
pygame 2.2.0 (SDL 2.0.22, Python 3.11.1)
Hello from the pygame community. https://www.pygame.org/contribute.html
key down
key right
key up
key left
터미널을 확인해 보니 제대로 동작합니다.
이번에는, 이 동작을 통해 물체 위치를 변경해 보겠습니다.
우선, 빨간 물체를 소환합니다. _object라는 멤버 변수명으로 생성하였습니다.
    def _init(self):
        pg.init()
        self._display_surf = pg.display.set_mode(self._size)
        pg.display.update(self._get_field_rect_list())
        self._object = pg.Rect(0, 0, self._tile_size, self._tile_size)
        _draw_rect = pg.draw.rect(self._display_surf, (255, 127, 127), self._object)
        pg.display.update(_draw_rect)
        self._running = True
이제는 이 _object를 움직이기 위해, move함수를 만듭니다. 사실 이미 pygame 내에 rect에 대한 move함수가 있습니다.

pygame에서의 move함수는 옮겨진 rect를 return 합니다. 이 함수를 활용해서 move함수를 만들어줍니다.
좌상단이 (0, 0) 기준점입니다. 기준점을 고려하여 위를 누르면 -1, 아래를 누르면 1로 좌표 이동하는 것을 잊지 맙시다.
    def _event(self):
        for event in pg.event.get():
            if event.type == pg.QUIT:   ## Window 상단 X버튼
                self._running = False
            elif event.type == pg.KEYDOWN:
                if event.key == pg.K_UP:
                    self._move( 0,-1)
                elif event.key == pg.K_DOWN:
                    self._move( 0, 1)
                elif event.key == pg.K_RIGHT:
                    self._move( 1, 0)
                elif event.key == pg.K_LEFT:
                    self._move(-1, 0)

    def _move(self, x, y):
        self._object = self._object.move(x*self._tile_size, y*self._tile_size)
        _draw_rect = pg.draw.rect(self._display_surf, (255, 127, 127), self._object)
        pg.display.update(_draw_rect)
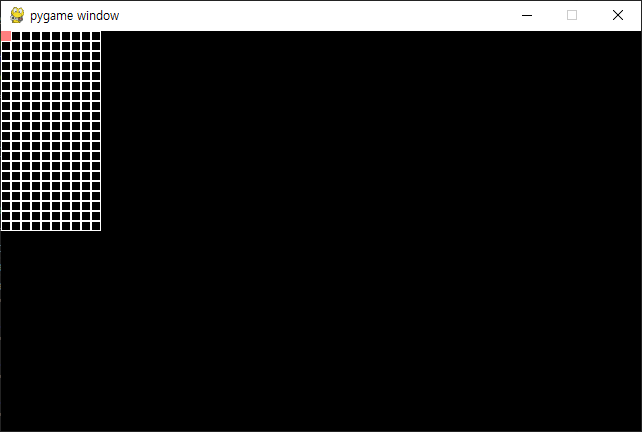
이제 실행해 봅시다.
문제 발생...

사각형의 흔적이 지워지지 않고 그대로 남아있습니다. 어찌된 일일까요? 이 현상을 ChatGPT에게 물어보았습니다.
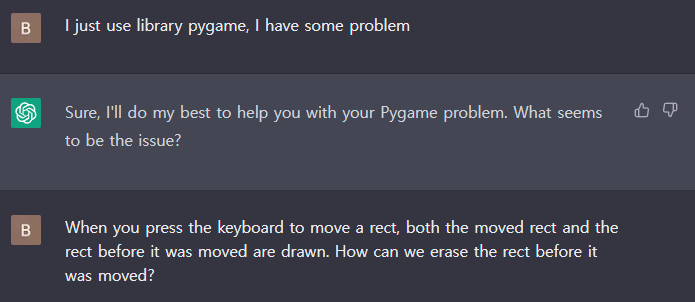
그랬더니 다음과 같은 답변과 코드를 제시합니다.
To erase the previously drawn rectangle before moving it to a new position, you need to redraw the area of the screen where the old rectangle was located with the background color or any other appropriate color that matches the surrounding area. This will effectively erase the old rectangle.
Here's an example code snippet that demonstrates this concept:
import pygame

# initialize pygame
pygame.init()

# set screen dimensions
SCREEN_WIDTH = 640
SCREEN_HEIGHT = 480

# set up the display
screen = pygame.display.set_mode((SCREEN_WIDTH, SCREEN_HEIGHT))

# set up colors
BLACK = (0, 0, 0)
WHITE = (255, 255, 255)

# set up the rectangle
rect = pygame.Rect(100, 100, 50, 50)

# set up the clock
clock = pygame.time.Clock()

# run the game loop
running = True
while running:
    # handle events
    for event in pygame.event.get():
        if event.type == pygame.QUIT:
            running = False
        elif event.type == pygame.KEYDOWN:
            # erase the old rectangle by redrawing the screen with the background color
            screen.fill(BLACK)
            # move the rectangle based on the key pressed
            if event.key == pygame.K_UP:
                rect.move_ip(0, -10)
            elif event.key == pygame.K_DOWN:
                rect.move_ip(0, 10)
            elif event.key == pygame.K_LEFT:
                rect.move_ip(-10, 0)
            elif event.key == pygame.K_RIGHT:
                rect.move_ip(10, 0)

    # draw the new rectangle
    pygame.draw.rect(screen, WHITE, rect)

    # update the display
    pygame.display.update()

    # limit the frame rate
    clock.tick(60)

# quit pygame
pygame.quit()
In this code, the screen is filled with the background color (black) before moving the rectangle in response to a key press event. This effectively erases the old rectangle before drawing the new one in its new position.
I hope this helps! Let me know if you have any further questions.
* ChatGPT의 답변
ChatGPT가 예제코드까지 제공해 줍니다. 한번 실행해볼까요?
기능적으로 완벽하게 동작하는 ChatGPT의 코드를 분석해 보니, 이전 사각형의 잔상을 지우기 위해 검은 화면으로 한번 뒤덮는 구간이 있습니다. Screen.fill(BLACK) 함수는 처음 보지만, 사용하기 어렵지 않습니다.

잔상을 없애는 원리를 그림으로 좀더 쉽게 이해해보겠습니다.


두 그림의 차이를 아시곘나요? 이해하셨으면 잔상을 없애봅시다.
    def _update(self):
        self._display_surf.fill((0, 0, 0))
        self._draw_field_rect_list()
        pg.draw.rect(self._display_surf, (255, 127, 127), self._object)
        pg.display.flip()
다음과 같은 함수를 작성해 보았습니다. _update는 다음과 같이 동작합니다.
- 전체를 Black으로 채운다 (surface.fill() 함수 사용)
- 필드를 그린다.
- 이동한 object를 그린다.
- display.filp()으로 surface.fiil, pygame.draw를 update 한다. (display.update는 이제 사용하지 않습니다)
_update 함수는 execute의 while문에 위치합니다.
    def execute(self):
        self._init()

        while self._running:
            self._event()
            self._update()
        self._quit()
전체 코드는 다음과 같습니다.
import pygame as pg


class Tetris:
    def __init__(self, width: int, height: int,
                 field_w:int=10, field_h:int=20, tile_size:int=10):
        self._size = self.width, self.height = width, height
        self._field_w, self._field_h, self._tile_size = field_w, field_h, tile_size
        self._display_surf = None
        self._running = False
        self._object = pg.Rect(0, 0, self._tile_size, self._tile_size)

    def _init(self):
        pg.init()
        self._display_surf = pg.display.set_mode(self._size)
        self._draw_field_rect_list()
        self._running = True

    def _draw_field_rect_list(self):
        for i in range(self._field_w):
            for j in range(self._field_h):
                _new_rect = pg.Rect(i*self._tile_size, j*self._tile_size, self._tile_size, self._tile_size)
                pg.draw.rect(self._display_surf, (255, 255, 255), _new_rect, 1)

    def _event(self):
        for event in pg.event.get():
            if event.type == pg.QUIT:   ## Window 상단 X버튼
                self._running = False
            elif event.type == pg.KEYDOWN:
                if event.key == pg.K_UP:
                    self._move( 0,-1)
                elif event.key == pg.K_DOWN:
                    self._move( 0, 1)
                elif event.key == pg.K_RIGHT:
                    self._move( 1, 0)
                elif event.key == pg.K_LEFT:
                    self._move(-1, 0)

    def _move(self, x, y):
        self._object = self._object.move(x*self._tile_size, y*self._tile_size)

    def _update(self):
        self._display_surf.fill((0, 0, 0))
        self._draw_field_rect_list()
        pg.draw.rect(self._display_surf, (255, 127, 127), self._object)
        pg.display.flip()

    def _quit(self):
        pg.quit()

    def execute(self):
        self._init()

        while self._running:
            self._event()
            self._update()
        self._quit()

def main():
    tetris = Tetris(640, 400)
    tetris.execute()

if __name__ == "__main__" :
    main()
실행하면 아래 그림과 같습니다.
이제 event까지 다룰 수 있게 되었습니다.
다음에는 사각형 블록 대신 미노를 움직여 보겠습니다.
* reference
'Development > Tetris' 카테고리의 다른 글
| Python - 테트리스(Tetris) 만들기 (7) - Drop Timer (0) | 2023.03.08 |
|---|---|
| Python - 테트리스(Tetris) 만들기 (6) - Tetriminos (2) | 2023.03.07 |
| Python - 테트리스(Tetris) 만들기 (4) - Draw Rect (0) | 2023.03.05 |
| Python - 테트리스(Tetris) 만들기 (3) - Pygame Library (0) | 2023.03.04 |
| Python - 테트리스(Tetris) 만들기 (2) - 환경 설정 (0) | 2023.03.04 |


